
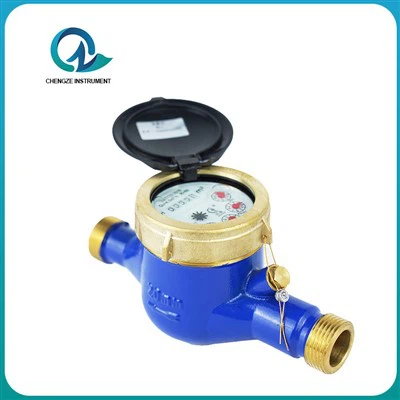
IoT Remote Water Meter Hey everyone, it’s Jake here from the mechanical water meter team—y’know, the folks who’ve been hooking up multi-unit buildings with reliable, no-fuss water meters for over a decade. I get it, tackling a meter install in a multi-unit spot can feel like herding cats. One wrong move, and you’re chasing leaky pipes, tenant complaints, or way too many callbacks from the building manager who swears his last meter job “bled the whole 3rd floor.” But guess what? I’ve sat through my fair share of those messy installs, and today I’m breaking down exactly how to get it right—no fancy jargon, no hidden hoops, just the real-deal steps we use every day at work. Let’s dive in. First off, if you’re here because you’re a building manager, maintenance tech, or even a landlord with a growing portfolio, this is for you. I’ve seen too many guys skip the prep work because “it’s just a meter,” and they end up paying double to fix mistakes later. So let’s start with the non-negotiable prep that actually makes the install smooth, not a nightmare. Step 1: Do Your Homework (But Skip the Overcomplicating) First things first—figure out what kind of units you’re working with. Are these studios, 2-bedrooms, or a mix? Each unit’s water usage will be different, so you can’t just grab one generic meter and call it a day. For example, a studio with a small sink and shower doesn’t need the same flow capacity as a 2-bedroom with a washing machine and dishwasher, right? Our team always checks two key specs before we even show up: the pipe size and the expected maximum flow rate. Pipe size is easy—most multi-unit buildings use ¾-inch or 1-inch pipes for individual units, but some older buildings have ½-inch, and that’s a no-go for high-usage units. If you’re not sure, just grab a tape measure and check the diameter of the existing pipe—no need to tear into walls or call a plumber for a pre-inspection (though if you’re in an old building with corroded pipes, maybe swing by). Next, pick the right meter type. We specialize in mechanical water meters, which are perfect for multi-unit builds because they’re durable, easy to read, and way cheaper to maintain than electronic ones. For residential units, our positive displacement mechanical meters are the go-to—they handle steady, everyday water use without the glitches that come with cheap knockoffs. For commercial units (like a building’s laundry room or shared gym restrooms), we go with turbine-type mechanical meters, since they handle higher flow rates without wearing out fast. Pro tip here: Don’t buy meters online from random websites just because they’re cheap. I’ve seen those knockoffs die in 6 months, and then you’re pulling every meter out again in a year. Stick with reputable suppliers—hint hint, that’s us—and you’ll save yourself so much hassle. Step 2: Prep the Site (No, It’s Not Just Clearing a Spot) Now that you’ve got the right meters, it’s time to get the spot ready. This is where a lot of installs go wrong—guys toss a meter under a sink and call it done, but then you get leaks because of bad placement. First, the meter needs to be in a accessible, dry spot. If you can put it inside the unit, near the water main (usually by the front door or under the kitchen sink), that’s way better than a basement crawl space you have to fight spiders to get into. Tenants hate having to wait around while you climb through crammed spaces, and maintenance teams hate it too. Also, make sure there’s enough space around the meter for reading—you need at least 6 inches in front for the digital or analog display, and a couple inches on the sides for wrenches when you need to replace it down the line. No cramming it into a 2-inch gap between two pipes. Another big one: check the pipes for damage before you even install the meter. If there’s rust, corrosion, or pinhole leaks in the pipe where the meter is going, replace that section first. I can’t tell you how many times we’ve installed a brand new meter on a 20-year-old pipe that’s about to burst, and then the building manager is mad at us when we have to come back and fix it. Spend 15 minutes checking the pipes now, and you’ll avoid a 3-hour emergency call later. Also, turn off the main water supply to the unit (or the whole building, if you’re working on a shared line) before you do anything. I’ve had a couple of interns forget that step, and let’s just say we had water shooting from a sink for 10 minutes before we fixed it. Moral of the story: turn the water off. Step 3: Install the Meters the Right Way (Not the “I Can Get It In Fast” Way) Okay, now we’re at the fun part—actually putting the meters in. First, make sure you have the right tools: adjustable wrenches, Teflon tape (the good stuff, not the cheap kind that falls off), a pipe cutter (or a hacksaw, if you’re in a pinch but don’t tell your boss I said that), and a bucket for catching excess water. Let’s start with the individual unit meters, since that’s what most people are installing. First, cut the existing pipe where you want the meter to go. Make sure the cut is straight—if it’s angled, the meter won’t line up right, and you’ll get leaks. Then, wrap the Teflon tape around the pipe threads in a clockwise direction (this is key—if you wrap it counterclockwise, it’ll unravel when you screw the meter on). How many layers? About 3 to 4. Don’t go overboard, because too much tape can get into the meter and mess up the mechanism. Now, screw the meter onto the pipe by hand first, then tighten it with a wrench—about ¼ turn past hand tight. Don’t over-tighten it, because that can crack the meter’s housing, and then you’ve got a whole new leak. Wait, here’s a critical rule: always install the meter with the arrow pointing in the direction of the water flow. This is such a common mistake, and if you put the meter backwards, it will either measure water use wrong or stop working entirely. I’ve seen guys do this, and they have to come back a week later to fix it because the tenant’s bill was off by $200. So double check that arrow before you tighten anything. If you’re installing a shared building meter (for the whole building’s main line), the process is almost the same, but you’ll need to use a larger meter, and make sure you have a union valve on either side of the meter. That way, if you ever need to replace the meter, you don’t have to cut the whole main pipe—just turn the valves and swap it out. Game changer for future maintenance. Step 4: Test for Leaks and Calibrate (Don’t Skip This—Seriously) Okay, you’ve got the meter in. Now what? Don’t just turn the water back on and bolt. You need to test for leaks first. Slowly turn the water back on (full blast will blast water everywhere), and walk around the unit checking every connection: where the meter meets the pipe, where the Teflon tape is, all that. If you see even a tiny drip, tighten the fitting a little more—don’t overdo it, but a small adjustment usually fixes it. If there’s a leak that won’t stop, take the meter off, add a little more Teflon tape, and try again. Once the leaks are fixed, it’s time to test the meter’s accuracy. Here’s an easy way to do it for residential units: get a 5-gallon bucket, turn on the unit’s cold water, and time how long it takes to fill the bucket. Then, check the meter’s reading during that time. For example, if the bucket takes 2 minutes to fill, that’s 5 gallons, so the meter should show about 0.05 gallons (since most meters measure in 0.01-gallon increments). If it’s off by more than 5%, something’s wrong—either you installed it backwards, or there’s a problem with the meter. Our mechanical meters are calibrated at the factory, but sometimes shipping or a tight fit can throw them off a little, so this test is quick and worth it. Step 5: Wrap Up and Make It Easy for Maintenance and Tenants The install isn’t done just because the meter is working. You need to leave a note for the building manager and the tenant. For the building manager, write down the meter locations, model numbers, and when you should check or replace them (our meters last 15-20 years, but it’s good to remind them). For the tenant, tell them where the meter is, how to read it if they ever need to, and who to call if they have a problem with the water bill or the meter. Also, label the pipes so the next maintenance tech doesn’t mix up the main water line with the unit’s line. I’ve seen so many techs dig through a basement and shut off the wrong line because there are no labels, and that’s a whole other headache. And here’s a quick tip for multi-unit buildings: if you’re installing multiple meters at once, assign each unit a number and keep a spreadsheet that matches unit numbers to meter serial numbers. That way, when a tenant calls about a high bill, you can pull up their meter’s reading in 10 seconds, no guessing. Now, let’s talk about common mistakes I see all the time, so you can avoid them. First, using the wrong meter size. If you put a meter that’s too small for a high-flow unit, it will get damaged fast and give bad readings. If it’s too big, it won’t register small amounts of water (like a dripping faucet), so you’ll lose revenue as a landlord. Second, not installing the meter in a accessible spot. If you put it in a basement with no lights, you’re going to hate checking it every quarter. Third, skipping the leak test. I once did an install where the tech skipped the test, and the tenant had a leak under their sink that ran for 2 weeks before they noticed—$800 water bill, and we had to come fix the meter. Worth the 5 minutes to check. And fourth, buying cheap knockoff meters. Yeah, they’re $10 cheaper, but they die in 6 months. Our mechanical meters are built to handle everyday wear, no fancy electronics to glitch, and they come with a 5-year warranty, so you don’t have to worry about replacing them every year. Now, if you’re in the middle of a multi-unit build or a renovation, and you need help picking out the right meters, or you have a question about an install, don’t hesitate to reach out to our team. We’ve worked with everything from small 8-unit apartment buildings to 50-unit condo complexes, and we can give you customized advice that fits your needs. Whether you need a few meters for a small project or a bulk order for a big build, we’ve got you covered. Just get in touch to start the conversation about your requirements and get a quote that works for your budget. At the end of the day, installing mechanical water meters in multi-unit buildings doesn’t have to be a pain. Just do the prep, use the right tools and meters, double check the basics (flow direction, leak tests), and you’ll have a setup that works for years. No surprises, no callbacks, just accurate readings and happy tenants. I’ve been on both sides of this—messing up an install and nailing one—and trust me, following these steps makes all the difference. If you ever need help, we’re here. Shoot us a message, and let’s get your project going. References: 1. American Water Works Association. (2020). Meters and Flow Measurement for Residential and Commercial Applications. 2. Building Owners and Managers Association International. (2021). Multi-Unit Property Maintenance Guide: Water Meter Installation Best Practices. 3. International Plumbing Code. (2022). Chapter 6: Water Supply and Distribution Systems. Mechanical Water Meter
Shandong Chengze Instrument Co., Ltd.
We’re well-known as one of the leading mechanical water meter manufacturers in China, featured by quality products and good service. Please rest assured to buy high-grade mechanical water meter for sale here from our factory. Also, customized service is available.
Address: No.7, Wensi Road North Industrial Park, Liguan Town, Lanshan District, Linyi City, Shandong Province, China
E-mail: czwatermeter@163.com
WebSite: https://www.cz-watermeter.com/
